brian comer running coach

Rowing for Runners

by Coach Brian Comer

On a recent trip to Seattle, I found myself on the University of Washington campus, in the shadow of the Conibear Shellhouse, home of the University of Washington rowing team. While of course being the current home of the team, it also holds its esteemed place in history as the home of the 1936 Olympic Team that went on to win gold in Men’s 8s. Over this past weekend, as I was watching “Boys in the Boat”, which detailed the story of the aforementioned legendary 1936 US Olympic Men’s Rowing Team, it dawned on me while watching some of the scenes surrounding the training, rowing really is a full body workout. At first glance, one might see it as mostly an upper body workout, but to maximize your rowing, it really takes engaging the legs and core as well. Truth be told, I’ve had athletes over the years ask me how rowing can be of benefit to their running and how to appropriately implement it into their cross-training regimen. My hopes with this article are to explain how you can use it as a cross training tool.

Rowing is a Full Body Workout

As alluded to in the introduction, rowing is in fact a full body workout. Even though rowing is done in a seated position, it helps build stability, something many runners lack given the singular-planed nature of running. I’m big on the concept of “building the whole athlete” and rowing will most definitely have you using muscles that you normally don’t use while running. While one might justifiably question whether rowing is really an accessible activity, chances are that your gym likely has a rowing machine or two. So just because you don’t live near open water or live in a cold weather environment, you can still get a good rowing workout in. 

Like all modes of cross training, rowing can help break up the monotony of running training and prevent injury. In addition, rowing can help improve efficiency and provide a low impact exercise option. Rowing can also increase force production (more speed with less effort) and improve endurance, even with a tight, concentrated time window. 

On the topic of injury prevention, rowing does this through helping improve one’s posture. To maximize your rowing, you need to make sure to not be in a hunched over position as rowing works the posterior chain, specifically the hips and hamstrings. In outlining these three key performance benefits of rowing for runners, who tend to be reliant on their quads. Renowned running PT Jay Dicharry states “rowing workouts offer a solution by helping runners to “find their hips, waking up and strengthening the posterior chain can help enhance stability and transition runners away from hunched, injury-inducing forms”. Like with all exercise, it is important to practice proper form and by nature, rowing is a hinge-based movement just as much as performing a deadlift in the weight room is.

How to Implement in your Training Plan

Jjust because you don’t live near open water or in a warm weather climate (this particularly didn’t stop the 1936 UW team, most of their fiercest collegiate competition hailed from northern states), doesn’t mean that there isn’t a place for rowing in your running training plan. In fact, due to the more controlled environment, it would almost be preferred to do these on a gym rowing machine. While with running, we often preach specificity, chances are the open water isn’t necessary for the runner’s rowing workouts as that isn’t the focus of performance. Plus, the added benefit of indoor rowing workouts is the ability to implement them year-round. 

Given the power benefits of rowing, sprints are easy to implement into training as is anaerobic threshold training. For intervals, you go based on time (again, improving our 2k row time isn’t a likely goal many runners reading this have) much like you would if you were programming intervals on an elliptical or bike. 

Not only does rowing have a place on higher intensity training days, but also on recovery days too. You can simply swap a running day for a rowing day and voila. Like running, rowing can help you improve not only your aerobic base, but your anaerobic capacity as well, both components that are necessary to maximize running performance. Often, you can even implement both of these in the same training session, a silver lining many runners may find helpful or motivating as runners tend to neglect the anaerobic or speed work necessary for improving race times. Total Row Fitness breaks it down in the context of their individual classes as every class “will incorporate both types of fitness, helping to improve your aerobic base (allowing you to go further) in pyramids, ladders, or mixed sets, and your anaerobic capacity (allowing you to go faster) through intervals, Big10s, and races ). This also highlights how one can really maximize the benefits in a short window because let’s face it, we’re all crunched for time every now and then. It really shows how rowing can give you more bang for your buck and not just be implemented when on an injury break or in need of a change of routine or scenery, but as a bonafide component of your training schedule.

Conclusion

To summarize, rowing is a very underrated form of cross training for runners. If on the runner’s mind at all, it is often on the back burner or simply not even considered as a cross training option. However, as seen in these outlined benefits, it very well could serve a place in your training plan regardless of where you are at in terms of your running. Do you seek to maximize your running performance? Rowing has a place for you. Simply looking to break up the monotony and get a change of scenery? Rowing can do that. Injured and looking to maintain or even build fitness during your time off? Rowing can do that too. All in all, I hope this article inspires you to embrace that rowing machine at your local gym and use it as a means of cross training. Or maybe like me when it came to the idea of getting around to writing this article, you were inspired to do so by “The Boys in the Boat” story. But like in all things when building consistency, it doesn’t matter if you go far or fast, but that you just simply go and give it a try.

brian comer running coach

Coach Brian Comer is a coach with Team RunRun. To learn more about him or to work with him, check out his coach profile.

Eccentric Calf Raises

Eccentric Calf Raises – Fix Your Injuries and Unlock Your Potential with Coach Brant Stachel

Elevating Performance and Injury Prevention

Eccentric calf raises are a powerful exercise for runners, offering substantial benefits in both injury prevention and performance enhancement. Particularly effective for addressing issues related to the Achilles tendon, tibialis posterior, plantar fascia, and general ankle health, this exercise is a staple in both rehabilitation (rehab) and preventative (prehab) routines.


Why Eccentric Calf Raises Matter for Runners?

Eccentric calf raises focus on the lowering phase of the calf raise movement. This eccentric motion is vital for building strength in the muscles and tendons of the lower leg, which are crucial for runners. The exercise aids in:

  • Strengthening the Achilles Tendon: Essential for absorbing and releasing energy during running.
  • Enhancing Tibialis Posterior Health: Plays a key role in supporting the arch of the foot.
  • Improving Plantar Fascia Flexibility: Reduces the risk of plantar fasciitis, a common runner’s ailment.
Eccentric calf raises can strengthen key lower leg attributes to reduce injury risk and make you a stronger runner.


How to Perform Eccentric Calf Raises

  • Double Leg Version:
    • Stand on the edge of a step.
    • Lift heels slowly, then gradually lower them below the step level over five to six seconds.
    • The slow lowering (eccentric phase) is crucial; it’s where most of the strengthening occurs.
  • Single Leg Version:
    • Use a railing or wall for balance.
    • Lower one heel below the step level, taking five to six seconds, then return to starting position.
    • Ensure to engage the calf muscle intensely during the lowering phase.

Performing these exercises regularly can significantly enhance lower leg strength and flexibility, crucial for running efficiency and injury prevention.

Check out this video to learn more. 

Implementing Eccentric Calf Raises in Your Routine

Incorporating this into your regular training routine is straightforward:

  • Frequency: Begin with two to three sessions per week.
  • Repetitions: Start with one set of 10 reps for both double and single-leg versions, gradually increasing as strength improves.
  • Progression: As your calves get stronger, you can increase the number of sets or add weight for additional resistance.
    Time: 5-6 seconds on the eccentric portion of the calf raise has been shown to elicit benefits

Remember, consistency is key to reaping the full benefits of this exercise.

Beyond Injury Prevention: Enhancing Running Performance

While the primary aim of eccentric calf raises is to prevent injuries, they also play a significant role in improving running performance. Strong calf muscles and tendons contribute to a more powerful push-off during running, leading to increased speed and efficiency.

Step Up Your Running Game with Eccentric Calf Raises

Integrating eccentric calf raises into your training regimen can make a significant difference in your running journey. Not only do they fortify your lower legs against common injuries, but they also set the stage for enhanced performance, keeping you running stronger and longer.

Brant Stachel is a coach with Team RunRun. To learn more about him or to work with him, check out his coach profile.

Strength Training for Runners

Unleashing the Power of Strength Training in Your Running Practice

As runners, we often focus on the miles we log and the speed  in which we achieve them, but there’s another critical element that can elevate our performance and prevent injuries—strength training. Incorporating strength training into your running routine can have a transformative effect on your performance. Below I will explore the significance of single-leg strength work for stability and power, and how it can bolster your running prowess. Additionally, I’ll summarize some of  the latest research on strength training as a recovery tool, its role in building tendon strength, increasing growth hormone and testosterone, and the importance of strength training for maintaining overall health as we age.

The Power of Single-Leg Strength Work

Running is a dynamic activity of repetitive single leg hops that demands a strong and stable lower body and pelvis. Single-leg strength exercises are an essential component of strength training for runners, targeting the muscles that often get overlooked in traditional bilateral lifts. By focusing on one leg at a time, we can identify and correct any imbalances between the left and right sides of the body, reducing the risk of injuries caused by asymmetries.

Key Exercises for Single-Leg Strength:

  1. Single-Leg Squats: Develop quadriceps, hamstrings, and glute strength while improving balance and stability.
  2. Bulgarian Split Squats: Target quadriceps, hamstrings, and glutes, enhancing hip flexibility and stability.
  3. Step-ups: Strengthen quadriceps, hamstrings, and glutes, while also challenging balance and coordination.

By integrating these single-leg exercises into your strength training routine, you’ll not only enhance your running performance but also build a solid foundation for injury prevention and long-term joint health.

Strengthening Tendons and Muscle Recovery

Running places significant stress on our tendons and muscles, often leading to wear and tear injuries. Strength training for runners is a powerful tool for strengthening tendons and promoting muscle recovery. When you engage in resistance training, your muscles contract against resistance, stimulating the production of collagen in tendons, which enhances their strength and resilience.

Moreover, strength training improves blood flow to the muscles, aiding in the delivery of oxygen and nutrients necessary for tissue repair. This accelerates recovery post-run, reducing the likelihood of overuse injuries and allowing you to maintain a consistent training regimen.

Research Findings on Strength Training and Running Performance:

Studies have shown that incorporating strength training into a running program can improve running economy, which is the energy required to maintain a given running speed. This means that with improved running economy, you can run faster or longer with the same effort, ultimately enhancing your race performance.

The Hormonal Benefits of Strength Training

Beyond the physical gains, strength training offers unique hormonal benefits that can boost your running performance and recovery. Strength workouts stimulate the release of growth hormone and testosterone, both of which play crucial roles in muscle repair and growth.

Growth hormone is essential for tissue repair and regeneration, helping your muscles recover faster after intense training sessions. Additionally, an increase in testosterone levels contributes to muscle growth and enhances your body’s ability to synthesize protein, which is vital for muscle repair.

Conclusion:

Strength training for runners can be a transformative ally in your running journey, providing numerous benefits that extend far beyond the track or trail. By incorporating single-leg strength work for stability and power, runners can develop a well-rounded strength foundation, reducing the risk of injuries and enhancing performance. Moreover, the role of strength training in tendon strength, muscle recovery, hormonal optimization, and healthy aging underscores its significance in supporting a lifelong love for running.

Embrace strength training as a powerful complement to your running routine, and watch as you unleash your full running potential, fortified by a body that is strong, resilient, and ready to conquer any distance. I know my running certainly got better when I consistently incorporated strength training!

Brant Stachel is a coach with Team RunRun. To learn more about him or to work with him, check out his coach profile.

Pool Running for Runners

Pool running, also known as aqua jogging, is a popular form of cross-training for runners. This low-impact workout is performed in a pool and provides numerous benefits for healthy runners, including improved cardiovascular health and increased muscle strength. In addition, pool running can help prevent common injuries that often plague runners, such as shin splints, stress fractures, and knee pain.

One of the key benefits of pool running is that it provides a low-impact workout that is easy on the joints. Unlike running on land, which can put a lot of stress on the ankles, knees, and hips, pool running allows you to move your legs in a natural running motion without the impact. This makes it a great option for runners who are looking to cross-train in order to prevent injuries and maintain their overall fitness.

Another advantage of pool running is that it provides a full-body workout. Unlike running on land, which primarily works the legs, pool running also engages the upper body. This can help improve your overall strength and endurance, which can translate to better running performance. Additionally, using a flotation device or pool running belt can help engage the core, which can improve your balance and stability.

Incorporating pool running into your routine is also a great way to add variety to your workouts. This can help prevent burnout and keep you motivated to continue exercising. By switching up your routine and trying new forms of exercise, you can keep your workouts interesting and prevent boredom.

If you are a healthy runner looking to incorporate pool running into your routine, here are a few tips to get started:

  • Begin by setting a goal for your pool running workouts. This could be a certain number of minutes per workout or a specific number of workouts per week.
  • Start slowly and gradually increase the intensity and duration of your workouts over time.
  • Make sure to warm up and cool down before and after your pool running workouts to prevent injury.
  • Mix up your routine by using different flotation devices or pool running belts, and incorporating upper body movements.
  • Listen to your body and adjust your workouts as needed. If you experience any pain or discomfort, consult with a healthcare professional.

In my opinion as a coach who has used pool running with numerous athletes, incorporating this cross-training activity into your routine is a great way to add variety and maintain fitness levels during periods of injury or illness. Pool running has been an effective training tool for many of my runners looking to improve their performance, as it engages the upper body and provides a low-impact workout that is easy on the joints. Additionally, switching up your routine and trying new forms of exercise can keep your workouts interesting and prevent boredom. While there is limited scientific research on pool running, anecdotal evidence suggests that it can be a valuable form of exercise for healthy runners.

In terms of evidence to support the use of pool running for runners, there is limited scientific research available. However, a study published in the Journal of Sports Medicine and Physical Fitness found that pool running was an effective rehabilitation tool for runners recovering from lower limb injuries. Additionally, many coaches and athletes have reported positive experiences with pool running, citing its benefits for maintaining fitness levels during periods of injury or illness and improving running performance.

Takeaways:

  • Pool running provides a low-impact workout that is easy on the joints.
  • It engages the upper body and can improve overall strength and endurance.
  • Incorporating pool running can add variety to your routine and prevent burnout.
  • Begin by setting a goal for your pool running workouts and gradually increase the intensity.
  • Warm up and cool down before and after your workouts, and listen to your body.

Brant Stachel is a coach with Team RunRun. To learn more about him or to work with him, check out his coach profile.

Elliptical Training for Runners

Elliptical training is a popular form of exercise that has been gaining popularity among runners in recent years. This low-impact workout provides numerous benefits for healthy runners, including improved cardiovascular health and increased muscle strength. In addition, incorporating elliptical training into your routine can help prevent common injuries that often plague runners, such as shin splints, stress fractures, and knee pain.

One of the key benefits of elliptical training is that it provides a low-impact workout that is easy on the joints. Unlike running, which can put a lot of stress on the ankles, knees, and hips, elliptical training allows you to move your legs in a smooth, circular motion that is easier on your joints. This makes it a great option for runners who are looking to cross-train in order to prevent injuries and maintain their overall fitness.

Another advantage of elliptical training is that it provides a full-body workout. Unlike running, which primarily works the legs, elliptical training also engages the upper body. This can help improve your overall strength and endurance, which can translate to better running performance. Additionally, using the upper body handles on the elliptical machine can help engage the core, which can improve your balance and stability.

Incorporating elliptical training into your routine is also a great way to add variety to your workouts. This can help prevent burnout and keep you motivated to continue exercising. By switching up your routine and trying new forms of exercise, you can keep your workouts interesting and prevent boredom.

If you are a healthy runner looking to incorporate elliptical training into your routine, here are a few tips to get started:

  • Begin by setting a goal for your elliptical workouts. This could be a certain number of minutes per workout or a specific number of workouts per week.
  • Start slowly and gradually increase the intensity and duration of your workouts over time.
  • Make sure to warm up and cool down before and after your elliptical workouts to prevent injury.
  • Mix up your routine by using different resistance levels and incorporating upper body movements.
  • Listen to your body and adjust your workouts as needed. If you experience any pain or discomfort, consult with a healthcare professional.
  • Talk with your coach about how to incorporate this training into your overall plan. 

In conclusion, elliptical training is a valuable form of exercise for healthy runners. It provides a low-impact workout that is easy on the joints, engages the upper body, and adds variety to your routine. By incorporating elliptical training into your cross-training routine, you can prevent common injuries and maintain your overall fitness.

TAKEAWAYS: 

  • Elliptical training provides a low-impact workout that is easy on the joints.
  • It engages the upper body and can improve overall strength and endurance.
  • Incorporating elliptical training can add variety to your routine and prevent burnout.
  • Begin by setting a goal for your elliptical workouts and gradually increase the intensity.
  • Warm up and cool down before and after your workouts, and listen to your body.

Brant Stachel is a coach with Team RunRun. To learn more about him or to work with him, check out his coach profile.

What is Run Specific Core Training?

In 2008, Canadian Triathlete Carolyn Murray finally realized her dream of being selected for the Olympic triathlon team. Murray was often in the lead pack off the bike. However, despite being an excellent runner, she would fade during the run. After trying many strategies, Carolyn tried something different altogether. She doubled down on her core training. I recall her explaining that it was her stronger core, not more speed work or volume, that was the difference maker. She said her body could hold it together, maintaining a faster pace, as fatigue set in near the later stages of the race. 

This feel-good story always stuck with me. As an undergrad in kinesiology, it was exciting to see the relevance of a sound core training program start to be embraced amongst endurance athletes. Back then and still today, many endurance athletes fear strength training, including core training, thinking it will waste time or worse, reduce performance by creating large, bulky muscles. Done correctly and efficiently, this could not be further from the truth. 

Despite run training progressions, studies found that novice runners do not improve run techniques for greater efficiency or reduced risk of injury. 

They still showed a greater increase in trunk inclination (bending forward at the waist) and increased ankle eversion as the runners became fatigued.  Research indicates that poor core endurance can reduce your ability to maintain a trunk position, negatively affecting run kinematics. These trunk changes reduce run efficiency and increase risk of injury, indicating that core strength and endurance must especially be addressed. 

It is often said that every action each step we take is initiated from the core. It is often said that power comes from the core. When good technique is used during running or daily tasks, power is often generated through the hips and is transmitted through a stiffened or “braced” core. Lesser known or discussed, the core more often functions to prevent motion rather than initiating it, stabilizing and protecting the body. A “functionally strong core” is essential for injury prevention and optimal performance. 

What is the Core? 

We are not just talking abs here! Core encompasses your entire back, abdominal wall muscles, and glutes. It also includes your latissimus dorsi and psoas muscles, linking your core to the pelvis, legs, shoulders, and arms. You can essentially think of the core as everything aside from your limbs. Ideally, the muscles work together to create spinal stabilization, called “core bracing.” 

Unlike your limb muscles, your core muscles often co-contract, stiffening your torso so all muscles become synergists in your running and daily life activities. This is important, and this is the reason why training your core needs to be done differently than your limbs to be the most effective. 

Core and Run Performance

Is core training going to increase your V02max? Likely not. It will, however, improve something that may be more beneficial: running economy.  

Core endurance is a very important part of run training, as it helps to maintain an efficient trunk position. Studies have demonstrated that core stability training improves running performance. One of the reasons is, yep “core bracing!” With core bracing, the body becomes stiffer to accept the foot impact. 

Core endurance is especially important during long distance and/or high intensity running, as muscle fatigue is greater. Research aside, essentially every triathlete and runner I have seen with dysfunction, injury, and frustrating performance has had insufficient core strength and endurance, especially regards to spinal stability. Just look at a runner who is running, bent over. That was me when I started running! Not only does the bent over runner reduce one’s ability for oxygen exchange, the kinematics change, causing inefficiency and greater stress on the spine, hips, and knees. But this can be improved with a little consistent training. In the Ogaya study, for example, runners significantly improved their trunk muscular endurance after four weeks of training, three times per week. Their hip range increased, which can effectively open-up the stride, and angles of their lower limb angles improved, reducing risk of injury. 

How To Effectively Train the Core? 

Should you be doing sit-ups? Crunches? Isolating the obliques? Negative. 

In fact, doing repeated spine flexion (ie situps and endless crunches) are training the muscles in a manner they are rarely used, and performing numerous situps may increase risk of spinal disc injury. McGill, renowned spinal expert, states that “focusing on a single muscle generally does not enhance stability but creates patterns that when quantified result in less stability.” Your core is like a team: Together Everyone Achieves More. Effectively training the core means training all the muscles to work together.

The best way is to train the less glorified muscles. We are not talking 6-pack abs here, rather the deep pelvic and spinal stability muscles, referred often as “control exercises.” Exercises that truly enhance spinal stabilization are the exercises encouraging stiffening of the entire core musculature. The best way is also to include exercises that transfer into running, called “dynamic correspondence exercises.”  Dynamic correspondence exercises enhance movement patterns and other components of fitness to prepare you in the best way for your sport.

Three Core Exercises

Here are three great exercises for the runner toolbox that will improve your core strength / trunk stability specifically for running. Although I am also a fan of weight bearing core exercises (i.e. various offset carries), I chose these exercises as they do not require equipment, can be done anywhere, anytime, and are a great foundation to build on.  The dead bug and bird dog exercises especially mimic similar running movement patterns: Alternating mobility in one leg and stability in the other leg, along with opposing arm movements while core bracing, making these excellent dynamic correspondence exercises. 

Try and keep your training program simple, effective, and efficient for more energy and time to be spent doing what we love: Running!

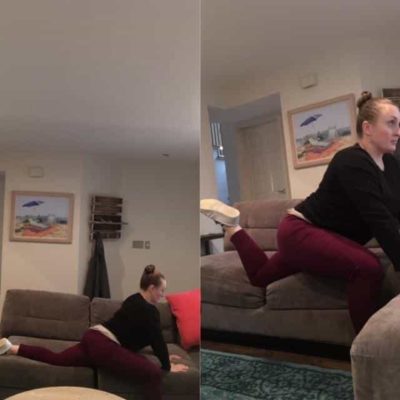
  1. Glute Bridge Variations

Why: Promotes the correct firing sequence pattern of: Engaging your glutes before your hamstrings and lower back. This enhances your ability to produce greater force and reduces risk of injury. So common in runners, hip flexors, back stabilizers, and other smaller muscles take on the roll of the glutes if they are not firing properly. The hamstring muscles can take over too much of the burden as well, extending the hips instead of what should be – the glutes. Over time, without the correct firing sequence, this can lead to overly tight muscles and negatively affects your stride.

How to (Figure 4 Glute Bridge Demo Link): 

Lay on your back with feet approximately hip width apart or a little wider, perform a very mild pelvic tilt (just a couple inches or so for a “neutral spine”) and focus on squeezing your glutes. This is super important. We can easily use our back muscles to compensate and just power through this exercise, changing the glute bridge exercise from beneficial to detrimental. Sometimes literally placing a finger on your side glute helps to activate the right muscle group. 

Cross your arms over your chest to reduce the help from your upper body, and slowly lift up. Breathe out on the way up, breathe in as you return to starting position.  There are many glute bridge variations. Please see demo links to a variation that does not require any equipment and will facilitate a hip stretch at the same time.   

Keep movements slow and deliberate. If you are experiencing fatigue before your desired reps are up, stop.  Done correctly, you likely will not lift up all that high and should feel your butt burning. Feel the burn!

Sets and reps: Try 10-12 repetitions per side, 2-3 sets, 2-3 x week. This is a general guideline only and will vary per athlete. Again, if fatigue sets in and you are losing form, stop. It is better to do 5 good repetitions versus 10 bad ones.

  1. Dead Bug Exercise

Why:  The dead bug is an excellent exercise for runners! It resembles motor skill patterning used in running. The dead bug is a control exercise. You are teaching your body to control and stabilize your trunk- essentially reinforcing a stiff and stable trunk and pelvis – while your limbs are moving. 

How to: Dead Bug Demo Link Here

Lay on your back with knees bent approximately hip width apart and your arms raised in the air directly above your shoulders. Bring both legs up, with your hips and knees flexed at approximately 90o. Your knees should be directly above your hips, with your ankles dorsiflexed (opposite of pointing your toes, pull them back), and your lower back in a “neutral position”. 

From this position, slowly lower the right leg, maintaining approximately 90o flexion and touch the ground briefly with your toes. Bring your right leg up, and alternate with the left leg. Repeat for desired reps or until you get fatigued. Advanced versions include extending the leg out instead of touching the ground, and the very advanced version includes extending the leg out while simultaneously pulling your opposite arm away from the leg.

You should be performing this in a slow and controlled manner, breathing in as you start the movement and breathing out upon returning to start position. 

It is vital that you maintain a neutral spine, it should not change during the exercise. For a neutral spine: perform a very slight pelvic tilt or you can think of gently pressing your ribs into the ground, “keeping your rib cage down.” Don’t overdo the pelvic tilt though, another common mistake! If you are not sure about this, a friend can help. He or she could place a resistance band under your lower back and gently try pulling the band out as you are doing the exercise and if he/she can’t pull it out, then you are keeping the neutral position. If you are on your own, you can try placing a small rolled up towel under your low back to start. 

Tips: If you feel your back losing its neutral spine, try doing less reps or a lower-level dead bug. Examples: dead bug breathing- in start position, breathe deeply 3-5 times then relax and reset. Or, shortening your lever (ie touch the ground closer to your butt with knees at a greater flexion). 

Remember, dead bug is a control exercise. If you see people using weight and/or powering through quickly doing tons of reps, don’t be tempted. As in most of these, they are a great exercise performed incorrectly and for the wrong reasons. Done correctly, you should really engage your lower abdominal (pelvic region) muscles, even just getting into the ready position. Remember to move slowly and thoughtfully! 

Sets and reps: Try 8-12 repetitions per side, 2-3 sets, 2-3 x week. Again, this is a general guideline only and will vary per athlete. Remember, if fatigue sets in and you are losing form, stop. Start with fewer reps or the modified versions mentioned. 

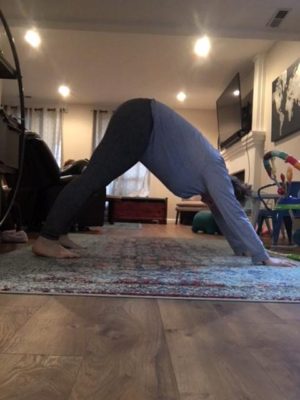
3. Bird Dog Exercise

Why: The bird dog is another control exercise that emphasizes core bracing while moving limbs, making it an excellent exercise for runners!

How To: Bird Dog Demo Link Here

Start all fours in “table-top position” (knees under hips and hands under shoulders). Press your hands firmly into the ground and while maintaining a neutral spine, slowly extend one leg out with opposite arm, then the other side, keeping your hips stable. This means keeping your hips square, and not allowing one hip to shift. This is the most important part of the exercise.  

I would start with arms only, progress to legs only, then finally the opposites once the previous variations become fairly easy. You can also add a band for resistance. However, be careful not to overload yourself and change your mechanics. Remember: The most important part is to keep your spine and hips stable. If one side is dropping, then you are defeating the purpose. Remember: Core bracing!

Sets and reps: Recommend 5-6 repetitions per side, 2-3 sets, 2x week. As with all, use the modifications best suited to your ability, stop and reset if you are fatiguing and losing form.

Word of caution:

If you have back problems or are experiencing back pain with any of these exercises, stop and see your health care practitioner. 

A Little Goes a Long Way

Including a few simple exercises consistently can make a positive impact on your running, both in terms of performance and injury resilience. Doing these exercises consistently – i.e. 3 times per week for less than 10 minutes – is a better payoff versus one big session per week. You can do these before a run, after your warmup, or within your strength and stretching sessions. 

Incorporate some specific core training consistently and enjoy the benefits. Run on!

Tammy Kovaluk is a coach with Team RunRun. To learn more about her or to work with her, check out her coach profile.

Stability Training vs Strength Training for Runners

This blog post comes straight from down under from our coach Tom Scott (based in Newcastle, Australia). Read on for a break down of stability vs strength, and how to add stability into your training as a runner.

The terms strength and stability training are often used interchangeably when referencing ‘strength programs’ for runners. However it is important to recognise that these are two very separate (although interlinked) physiological outcomes that provide different benefits to your running.

What is the difference between strength and stability?

Lets start by looking at the definition of each:

Strength – the amount of force a muscle can produce

Stability – the ability to maintain control of balance and joint movements by coordinating the action of muscles

Do you need both strength and stability training as a runner?

Running requires your limbs to act independently – one opposite arm/leg combination drives forward, while the opposing combination swings back. Muscle stability keeps your spine and pelvis in the correct alignment with all the rotation and swinging going on around them.

Put another way, while strength helps power you up a particularly steep climb or hold your pace at the end of a marathon, muscle stability provides a solid platform for you to run with a balanced, correct gait. Stability also helps you maintain that foundation when you are fatigued, such as at the end of a race.

How do I test my muscle stability?

There are a couple of simple tests to check in on your muscle stability. One is single-leg squats. When doing your single-leg squats, instead of counting how many you can complete, pay attention to your alignment. Do your hips look like this? 

If so, you need to improve your muscle stability.

A great exercise to test your stability is to close your eyes, stand on one leg and see how long you can balance for. If you can’t last at least one minute, you need to work on your core and hip stability.

How does stability training improve your running? 

Firstly, good stability reduces the potential for imbalances by keeping your core strong and in the correct alignment. Many running injuries initially start out with a fatigued stabiliser. That impacts running form, and it over-stresses a major muscle that is trying to compensate. For example, a fatigued glute muscle leads to a hamstring taking extra load and becoming tight and/or placing extra load on the knee. Secondly, good stability will improve your capacity to transfer the ‘strength’ generated by the major muscles groups into efficient and fast running.

How do you train for stability?

Generally your stability will improve over time with an ongoing running program as your stabilising muscles become stronger with running load. However, you are unlikely to develop strength in your stabilising muscles evenly, or adequately for large volumes of running, without dedicating time to work on them.

Specific stability training often includes single leg activities such as single-leg squats, single-leg deadlifts, lunges, and other such movements where you are balancing on one leg whilst moving your body in unstable positions.

Here is an example of a running-specific stability routine for new runners: 

Kettlebell Revolutions – 20 each leg 

Kettlebell Twisting Lunge – 10 total

Lateral hops – 10 each leg

Kettlebell Single Leg Squat – 10 each leg

Single Leg Rainbows – 15 each leg

Kettlebell Reverse Lunge – 10 each leg

Kettlebell Single‐leg Deadlift – 10 each leg

Leg Swings – 30 each leg (15 front to back, 15 side to side)

Kettlebell Swings – 10 each leg

Kettlebell Twisting Lunge – 10 total

Can I still lift weights?

One day, probably yes! However, many runners are best served by focusing on a dedicated stability program first. If you are new to running, or if you failed any of the above tests, then focus on stability training. After six months, if you achieve your goal running mileage without injury, you can incorporate strength training again. 

When it comes to running, training for both strength and stability is important. That said, stability training will give you a stronger foundation to run faster, longer, and more safely.

Get more training advice from Tom by joining Team RunRun and selecting him as your personal running coach!

Strength Training for Runners with Coach Laurie Porter

As a running coach and professional fitness trainer, I see the absolute necessity of implementing strength training into your routine. After all, if you just run, you will develop muscle imbalances. Because of the repetitive nature of running, muscle imbalances will eventually lead to injury. Many common injuries of the low back, hips, knees ankles and feet resulting from muscle imbalances are corrected by strength exercises, so why not add it to your routine. One of the most common muscle imbalance in distance runners is weak glutes, particularly the gluteus medius. The gluteus medius is responsible for hip abduction and hip external rotation. It also stabilizes the hip during the stance phase of the gait cycle. The strength circuit routine below addresses this very issue. Strength training also has many benefits that go beyond just injury prevention. Strength endurance, increased mitochondria (which aids in oxygen delivery to muscles), neuromuscular coordination, increased running economy, improved performance etc. . . .

Some things to consider when adding strength to your routine:

  • Two to three times a week is ideal. Contrary to what you might think, you should do your strength training on your quality days. In other words the days you are doing speed work or harder efforts. This way, your recovery days are truly recovery days.
  • Start with one full circuit and then add a second set after a couple weeks.
  • Start at the top working your way down the list of exercises without rest in between. When you are ready to add a second set, do the full circuit and then repeat.
  • Always exhale during the concentric phase (producing force) of the lift and inhale during the eccentric phase (reducing force) of the lift.
  • During the video you will hear me talk about the tempo of the exercises. For this routine we will use the 2-1-2 or 2-0-2 tempo. That simply means the concentric and eccentric phases of the lift are lasting two seconds. Between phases you can stabilize for zero to one second.
  • When choosing weight of dumbbells, bars or tension of bands, use weights or tension that you can do with good form for 15-20 reps. You should be at or near failure within that rep range. Otherwise decrease or increase the weight or tension.
  • Pay close attention to form. Throughout the video you will hear posture cues such as: tuck your chin in, lift your sternum, shoulders back, down and relaxed and so on. All of these are crucial when lifting weights. Think of posture as being dynamic not static. It is the foundation of all movements including running.

The workout listed below is perfect for implementing during your base building endurance phase or early to mid season or training phase. Also, see the posted video.

  • 1-2x Strength Training Circuit
    (After warm-up and dynamic stretching, all exercises should be slow and controlled unless otherwise indicated)
  • 15-20 Squat-to-Rows with exercise band
  • 15-20 pushups (drop to knees if needed)
  • 15-20 each leg Bulgarian Split Squats bodyweight progressing to dumbbells
  • 15-20 Lateral Flys with dumbbells
  • 15-20 Goblet Squats with dumbbell
  • 15-20 Rows with exercise band
  • 15-20 Stiff Legged Deadlifts (using bar and dumbbells)
  • 15-20 Triceps Extensions with dumbbells
  • 15-20 Lateral Band Walking using power band
  • 100 Jump rope (quick)

Laurie Porter is a coach with Team RunRun. To learn more about her or to work with Coach Laurie, check out her coaching page.

Incorporating Strength Training into Running During the Coronavirus Pandemic

There was a long debate on how to best incorporate strength training into a runner’s training program. While the consensus now states that strength training should be incorporated in some way in every runner’s training program, the age-old questions still remain – how much, how often, can you still get a good workout in a short amount of time, what about workouts with just bodyweight or limited equipment? As you’ll find in run training, everyone has different ideas on how runners should strength train, mostly based on their own personal experience, but also as is the case with running, there is no one-size-fits-all program.

Now there is another underlying question during the coronavirus pandemic. With gyms largely still being closed (outside of the exceptions few and far in between), people have had to be creative to get in workouts they would otherwise complete at the gym. In this article, I hope to offer some more ideas specific to distance runners on how you can get in your strength workouts, both during and after the coronavirus pandemic. While some may already have a training program that they implement to partner with run training, I hope to give you some ideas if you’re looking for something new to try or if your routine is starting to feel a little stale.

How to Strength Train at Home

This has become a big question in recent months due to the coronavirus pandemic, but it is possible to get in a good strength training workout at home with minimal or no equipment. Bodyweight workouts are a no-brainer and can be done anytime, anywhere whether that is at home, in a hotel room, or at the family cabin. The one caveat to bodyweight workouts is that it can become hard to progress with bodyweight workouts and to progressively load bodyweight workouts but there are some exceptions. It would involve swapping some exercises for new ones or by upping the difficulty on exercises you already do (instead of a traditional pushup, try decline pushups or instead of traditional lunges, try plyo lunges). An Internet search that can provide some inspiration in this regard and stroke your creativity are prisoner workouts. Once seeing a workout like “the deck of pain” (where you prescribe a suit with a particular exercise, face cards count as 10 reps, while aces count as 11) or Mike Tyson’s bodyweight squat routine while in prison, you’ll see firsthand how a deck of playing cards can lead to some creative workout regiments.

Regardless of budget, you can also find good equipment to build your own at home gym as well. I’m not even referring to barbells, squat racks, and the like, but I’ll offer my suggestions for an ideal minimalist equipment home gym that doesn’t break the bank. I also won’t be discussing DIY home gym equipment (but if you feel so called to go this route, then more power to you) though that is another Internet search that gets the creative juices flowing. I would say the cornerstone of a home gym are good dumbbells. I would personally suggest getting a pair of adjustable dumbbells because not only are they great in terms of storage (compared to buying several pairs of dumbbells of various weight) but they also have more range than you would typically get if you were to go the individual pairing route and not break the bank. Even shopping on the cheap and only getting weights in 5 pound increments, buying individual dumbbell pairs at various weight is still comparable in cost to the adjustable dumbbells, so may as well go for the convenience (and the more quality, durable product). Both Bowflex and NordicTrack have good pairs of adjustable dumbbells at various prices with similar ranges in terms of weight.

Another item I would suggest getting are resistance bands. They also store easily, are cheap and easy to find and are often quite applicable to use for running-specific exercises that are both lower and upper body. Exercise balls would also fall under this category and additionally they can help with progressing your workout (think back to the feet elevated or decline pushup vs. a regular pushup or placing your feet on the ball instead of the ground when doing glute bridges). These are different than medicine balls, although medicine balls are also what I’d consider great exercise equipment that you could put in your home gym if you have the budget and space. Jump ropes would also be good to have on-hand since sometimes you can’t beat the classics. While the cardio benefits are minimal compared to running, they still are a sneaky way to get some extra cardio in or to incorporate into a killer circuit. Plus, if you have children, jump ropes can be a way to get the whole family in on the fun.

As a bonus, two other things I would suggest for a home gym, so long as budget and space allow, are an ab wheel and a TRX Suspension System. A TRX has similar benefits to resistance bands but allows you to get more creative. The one caveat is that storage, or even finding a place to utilize it around the house, can be an issue unless you have a garage or a big enough attic or basement. An ab wheel is a personal spin of mine on at home workouts. They can be found at most fitness stores or online and typically run cheap while being easy to store. They are a different, if your looking for some variety, and an effective way to train your core, which are crucial running muscles.

Programming Strength Workouts Safely

One aspect of incorporating strength training for runners that tends to be the most uniformly agreed upon is the frequency of strength training sessions in a given week. Most would say that 2-3 strength workouts per week is the standard, ranging anywhere from 20-40 minutes per workout. You can certainly get good workouts longer than 40 minutes but recovering from the session needs to be taken into account. On the other hand, despite what many believe, you can get in a good strength training workout with less than 20 minutes as well, even just 10 minutes goes a long way. While this can come from the camp that 10 minutes is better than 0 minutes, we often do these kinds of workouts anyway while often not realizing it. Look no further than your post-run core routine to see a prime example of this. With these shorter workouts, as you’d expect, they can be done more frequently in a given week, as much as 5 times, because they don’t require as much recovery time as longer workouts would. Ultimately, you want to implement what is right for you.

Many people feel they don’t have enough time to add strength training to run training and to an already busy life, but these short post-run routines (which typically can be done anywhere and mesh well into post-run recovery exercises like stretching and foam rolling) prove that it can still be done amidst a busy schedule. If you feel you also fall under this category, completing full body workouts will also be more beneficial for you than to divide your workouts up by body part or by even doing an upper body/lower body split. For a runner, I would rarely build a strength program around body part splits, unless it was during a runner’s offseason or they are far enough out from key races that it makes sense to work on weaknesses. These kinds of splits are more often found in bodybuilding and while they have benefits for developing the whole athlete, it should be kept in mind that bodybuilding generally focuses more on looks and aesthetics rather than performance.

How Much Should I Lift and When?

Different strength workouts call for different protocols. The loads you lift in a circuit workout, where the emphasis is on completing as many rounds as possible and completing rounds as quickly as possible (minimizing rest periods), versus the loads you lift in a compound movement heavy workout, are going to look very different. Each of these workouts are trying to reach their own desired training effect that fall on opposite sides of the spectrum. There is no right or wrong answer here as both types of workouts have value. We aren’t just training different muscles, but also, different energy systems with these differing types of workouts.

Everyone should have days where they lift lighter and heavier much like how runners should have easy run days along with harder days like tempos, intervals and long runs. That is to ensure that, like with your running, your strength training workouts are also progressing over time as you get stronger and more fit. Just be sure that your strength workouts don’t detract from your run training, but rather, complement it. The biggest factors for individuals that should be taken into account are experience with strength training and past injury history when starting any strength program.

The biggest perk strength training provides runners with is that it helps with injury prevention. Runners move entirely in one plane of motion and strength training can help fix muscular imbalances and teach runners to not be so one dimensional, but to strengthen and develop the whole athlete. Heavy weightlifting workouts can be as important as strides and intervals in terms of developing a finishing kick. We train the aerobic system plenty while running or even during circuit training, but the anaerobic system benefits when we do short bursts close to max effort, both in running sprints and during a set of heavy barbell squats. This also trains the different kinds of muscle fibers found in our body. The slow twitch muscle fibers through steady aerobic exercise and the fast twitch muscle fibers through sprints and heavy lifting. For most, the fast twitch fibers disappear as you age and it the phrase “use it or lose it” very much applies as far as maintaining fast twitch muscle fibers. Runners have long been concerned, and some to the point of staying away entirely, of bulking up if they start lifting weights, but this won’t happen when putting in the running and cardio volume of an endurance athlete. So, while runners have long wanted to use that extra time to log more miles, that time would be better suited with a strength training workout.

Conclusion

As previously mentioned, while your strength training routine should complement your run training, you also want to make sure you are progressing in your strength training. During the pandemic, take it upon yourself to be extra creative in programming your at home strength training. You can program by workout type or you can incorporate multiple pieces into one workout. For those of you feeling really ambitious, another Internet search that gets the creativity flowing is playground workouts. It is a perfect excuse to get out of the house during the nice summer weather and get in some schoolyard jump rope and monkey bar pullups in. That being said, don’t commandeer Junior’s swing set so you can get in a set of pistol squats. More so now during the coronavirus pandemic, but if you go out to get in a playground workout in at the local park or schoolyard, if the playground has yellow caution tape surrounding it, or any other indication of being closed, don’t use that playground. Make sure to always abide by social distancing guidelines and to be cognizant of the high touch surfaces playgrounds tend to be.

Brian Comer is a coach with Team RunRun. To learn more about him or to work with Coach Brian, check out his coaching page.

running form drills

Running Form Drills with Coach Annelie Stockton

Annelie Stockton is a coach with Team RunRun. To learn more about her or to work with Coach Annelie, check out her coaching page.

running form drillsWhat are Form Drills?

Specific movements that help improve running ability. Start with slow dynamic stretching & work your way into faster movements. Form drills are designed to help loosen the body up, warm the body up for faster running, & improve form. Focus on staying strong, engage your core, & move efficiently. Do them all or pick some favorites & fit them in your schedule where they work best for you.

Benefits:

Performing drills consistently can help improve speed & running form, strengthen muscles & joints, & help with injury prevention.

When do to them:

There are many different ways to fit running drills in to your training. Some of my suggestions are

  • After 5-10 minutes into an easy run use these drills to help loosen up if you are feeling tight or stiff, then continue the rest of your easy run.
  • After an easy run perform these drills before doing strides (strides are 15-20 seconds of gradually picking up your pace to a hard effort)
  • After a running warm-up complete the drills before doing your hard speed intervals (track sessions, fartlek, tempo, hills, etc.).
  • You can also incorporate form drills into your cross training routine. After a short warm up (bike, elliptical, etc.) perform the drills and get back to the cross training OR perform the drills when you have completed your cross training session. Even while cross training, drills are a great way to work on running form without stressing the body.

How often:

I suggest form drills 1-3 times per week and performing 5-10 repetitions of each movement. You can spend anywhere from 5-20 minutes on these drills.

Arm Swings:

Slow skip & swing arms across the body.

Forward Arm Circles:

Slow skip & swing arms in forward circles.

Backward Arm Circles:

Slow skip & swing arms in backward circles.

Hamstring Stretch:

Reach opposite hand to foot.

Quad Stretch:

Swing leg behind & grab foot

Hip Stretch:

Squeeze knee to chest.

Side Shuffle:

Swing arms above head & move sideways.

Forward Leg Swing:

Swing leg forward & back, keep knee slightly bent & reach opposite hand towards foot.

Sideways Leg Swing:

Keep knee slightly bent.

Forward Hip Rotation:

Move leg backwards, Use hip to rotate leg, & bring forward, keep knee bent.

Backward Hip Rotation:

Move leg forward, use hip to rotate leg & bring backwards, keep knee bent.

A Skip Slow:

Bring knee towards chest & use “running arms.”

B Skip Slow:

Bring heel towards glute, swing leg through, & quickly snap the ground.

A Skip Fast:

Move quickly, focus on strong arms & core.

B Skip Fast:

Move quickly, focus on strong arms & core.

Butt Kicks:

Quickly bring heel to glute & use “running arms”.

High Knees:

Move quickly, keep good posture, bring knee towards chest, & use “running arms.”

Carioca:

Moving sideways, right leg goes up and over left, then behind left. Switch directions.

Annelie Stockton is a coach with Team RunRun. To learn more about her or to work with Coach Annelie, check out her coaching page.

Mobility Training for Performance and Injury Prevention with Allison Feldt, DPT

runner pt exercises allison feldtThis is the second post in a four part series geared directly to runners, prepared for us by Allison Feldt, DPT Physical Therapist and Owner of Body Motion Physical Therapy.

Find Part 1 here Regarding Body Maintenance Post-Run

The Importance of Mobility Training for Performance and Injury Prevention

Let’s talk mobility. As a runner your body is used to enduring, and let’s be honest, the longer, harder, and faster you go gives your brain that little extra releases of dopamine that reinforces the hard work. While mobility training and self-release might lack the “hit” or commonly known as the “runners high,” it can give you the ability to train harder, longer, and stay injury free while improving your performance.

One of the most common self-mobility type of work is foam rolling. A well-known release technique is using the foam roll for the IT band (iliotibial band). The importance of doing this is that you help loosen the attachment between your iliac crest and your knee. When tight, the IT band can cause knee, hip, and back pain, among other issues. The pressure that the foam roll places on the IT band allows it to loosen. It’s simply like giving yourself a massage. You will come across stretches for the IT band but in reality this is an extremely hard area to stretch as it is just a fascial band and not a muscle.

That brings me to what is fascia. Fascia is what encases the muscles and helps tie those muscles to the bone. There are multiple layers of tissue but let’s consider muscles, fascia, and skin when talking about self-release and mobility work. I like to describe fascia as wearing a really tight shirt or pants – if there is an area that is knotted up, that is going to affect the range of motion and mobility of the whole system. Imagine putting on a jacket that is too small and is so tight that you can’t even raise your arms over your head. You’re going to have trouble getting something in a cupboard or maybe even driving. So imagine you have areas of tightness like this jacket in your fascia from all the training. Just imagine how much better it would feel to not have to work against that resistance. Those areas of continued resistance often lead to pain and dysfunction throughout the body.

As a physical therapist and someone who’s trained for their fair share of races, I would like to share some of the key mobility releases that can be done to limit injuries and improve performance. Realistically, if you can fit mobility work into your routine at least three days per week, you will notice positive effects and ward off unwanted injuries.

ILIOTIBIAL BAND RELEASE

Using the foam roller, place the roller horizontally along the outside portion of your leg (perpendicular to your leg). Roll up and down from the hip bone to the knee. As you roll up and down you can stop and hold painful and sore areas for 30-60 seconds. It is also important to roll your body forward and backward to get all boarders of the IT Band. It is good practice to complete this techniques on each leg for 1-2 minutes per day.

CALF RELEASE

This can be done on a foam roll or a lacrosse ball. I want to note the importance of this release before telling you how to complete it. If you struggle running up hills and you feel tightness in the back of your legs this is going to be your best friend. You can actually improve your ability to tackle hills by working on elongating your calf muscles (gastrocnemius and soleus muscles). These muscles join to create the Achilles tendon and attach on the back of your heel. Take the lacrosse ball and place it in the center of your calf. You can then roll the ball up and down the calf muscles to work on elongating the muscles and loosening up the fascia. You also want to take the ball and roll it horizontally across the muscle (in a side to side motion). Again, this can be done for 1-2 minutes per leg.

PIRIFORMIS RELEASE

Runners notoriously have very tight hip muscles because the hips are use to going in only one plane of motion and that is forward and backward (hip flexion and extension). Therefore, loosening up the hip stabilizer muscles is very important in keeping the proper stride length throughout your run, which is going to help you maintain a consistent pace and help you ward off additional aches and pains that are associated with tight hips. Here you will sit on the foam roller. Cross one leg over the bent knee, shift your weight to the leg that is crossed and roll up and down releasing the hip muscles. You can hold if you find a particularly tight place. You can complete 1-2 minutes on each hip.

If you need additional guidance please contact [email protected]. We are very excited to offer SCRAPE & STRETCH sessions and packages to help athletes improve body recovery and enhance performance. If you find yourself sore, stiff or fatigued and are craving recovery, this can be very beneficial. It includes muscle release tailored to your specific body, myofascial release including manual techniques, cupping and instrument assisted massage and stretching.

 Allison Feldt, DPT, is the Owner of Body Motion Physical Therapy, where she specializes in sports, orthopedics, and women’s health. Her practice services the Greater Seattle area and Northern suburbs, with a focus on accelerating the rehabilitation process by bringing the physical therapy experience to your home or office, with a significant focus on manual techniques to help restore the body’s function.

www.bodymotionpt.com
[email protected]
206.715.7969

post run hamstring stretch

Body Maintenance Post Run with Allison Feldt, DPT

runner pt exercises allison feldtThis is the first post in a four part series geared directly to runners, prepared for us by Allison Feldt, DPT Physical Therapist and Owner of Body Motion Physical Therapy.

Body Maintenance Post Run

Running is a major time commitment. When you are committed to running, especially if training for long distances, most of your time training is spent hitting the pavement, trails or track. So the goal with these four posts is to give you some ideas on how to keep your motor running injury free and how to enhance the motor performance come race day.

Let’s be honest, most people prepare for a run by simply tying their shoes, maybe they have made sure they are adequately hydrated, have used the toilet and eaten something, if that’s part of their routine. You may pull a leg up to your bottom to stretch your thigh for a few seconds but that’s probably it. After the run you might do the same stretch and hop into the shower. I am going to come back to the pre-run warm up on the next post. But let me share with you the crucial elements to incorporate post-run.

After the run is the best time to incorporate static stretching. Static stretching is a prolonged hold so the muscle fibers can elongate. This is going to improve circulation to tired muscles, and enhance range of motion and flexibility. The holds should be maintained for 30 to 60 seconds. What this means to you as a runner who is probably short on time, and in a rush to jump in the shower is that you want to get into a position that will stretch the most possible structures in the shortest amount of time.

Let me share with you my absolute favorite “must do” stretches post run. Please note, sometimes post-run you may just jump in the shower and forget to stretch, but as luck would have it, these are shower safe. Much of the time that is where my post-run stretches occur. Also if you are feeling tightness in a place that was not addressed with these recommended stretches, you should absolutely stretch that area. These are just general guidelines to address the muscles most utilized during the run. If you need assistance in identifying how to stretch what feels tight, simply e-mail [email protected] for free guidance.

These stretches may have to be adapted if the ground is wet or raining and you’re not in the mood to get soaked. The targeted muscle groups: hamstrings, hip flexors/quadriceps, gluteal muscles, calves/feet. Running uses muscles in 1 plane of motion front to back, so that is why the muscles on the front and back of our body must be stretched post run. It is also nice to incorporate the gluteal muscles which are muscles on the lateral (outside) part of the leg as these are working to stabilize you.

Hip Flexor Stretch with the Quadriceps addition: This can be done on a couch as shown, or I have been able to do this on a bumper of a car. The side of the bath tub may work too. The idea is to start with one leg supported on couch/surface, other knee is bent to 90 deg (this will allow for a stretch at the top of the hamstring). Press chest off of couch or supported surface to feel the stretch on the front of the hip and thigh (of the leg supported on the surface). The adaptation is to also bend the knee to get a quadriceps stretch. Hold 30-60 seconds and repeat 2-3x. BUT even 1 round is better than nothing.

post run stretches

Hip External Rotation – Piriformis Stretching

Start on hands and knees.  Lift up and bring the leg to be stretched up into a figure 4 position.  Scoot back to increase the stretch.  Roll a little to adjust the location of the stretch, but try to keep your pelvis square to the front.  Bringing your foot closer to your elbow which will also increase the stretch.  You should feel this in your gluteal muscles on the side of the bent leg. Support yourself on your elbows or hands.

post run stretches piriformis

Toe Stretch: (Modification to a half kneeling or standing can be done to improve tolerance).

In kneeling, place your toes on the floor so that they bend upwards. Next sit back on your calves to increase the stretch in your toes. This is also stretching the arch of the foot and is great for toe mobility (which improves the force absorption capacity of the foot). Lean forward to lessen the stretch and lean back to increase the stretch. Hold 30-60 seconds.

post run stretches toe stretch

Hamstring Stretch:  This is excellent for hamstrings, Achilles and the back. Begin facing downward in a push up position. Bend at the hips and walk your feet toward your hands until you have maximally flexed your hips while maintaining your palms on the ground. To increase the stretch, reach your hips toward the wall behind you. Attempt to maintain contact with heels to floor. Modification would be to put your hands on elevated surface such as a on a counter top and complete the same stretch.

post run hamstring stretch

Allison Feldt, DPT, is the Owner of Body Motion Physical Therapy, where she specializes in sports, orthopedics, and women’s health. Her practice services the Greater Seattle area and Northern suburbs, with a focus on accelerating the rehabilitation process by bringing the physical therapy experience to your home or office, with a significant focus on manual techniques to help restore the body’s function.

www.bodymotionpt.com
[email protected]
206.715.7969

yoga for runners

Yoga for Runners – Coach Annelie Stockton

Why Yoga?

For the first 3 years of my running career I suffered from sciatica on the left side of my body. It would come and go and there were times that the pain was so bad I could barely walk. I tried everything to help my sciatica but nothing seemed to work. It wasn’t until I found yoga that I noticed a difference. I have been practicing Vinyasa Yoga 2-4 times per week for about 4 years now and my sciatica has not come back. Yoga has allowed my body to recover quickly from running, stay injury free, enabled me to run higher mileage, train harder, and most importantly train consistently.

There are many benefits of yoga for runners. Yoga improves flexibility, core strength, stability, mental toughness and focus.  My favorite type of yoga is Vinyasa Yoga. It is a fast-paced class, the room is usually heated (not hot), and focuses on stretching and strengthening your entire body. Because it is faster paced, it is another way to get in some extra cardio instead of pounding the pavement. Vinyasa Yoga is great to do after an easy run or as a cross training workout.

In yoga, poses are done on both the right and left side, this exposes areas that may be weaker and helps you to strengthen these areas to create a balanced body. Although I had sciatica on my left side only, after practicing yoga I noticed my right side was actually the side that was weak and tight. The balancing poses and deep stretching postures in yoga are what really helped me build strength and stay injury free.

Yoga helps you develop a strong core; there will be various ab exercises, plank poses, and you will engage your core in all of the standing and balancing postures. A strong core is the center of a yoga practice and is also one of the most important parts of being a healthy and strong runner. There are poses in class that can be very challenging. You learn to hold poses, breathe through postures that are uncomfortable, stay focused, and to push yourself. These are all important tools that can be applied to your running.  

From my experience, the minimum effective dose of yoga is 2 days per week in an hour Vinyasa class. My favorite time to practice yoga is after an easy run, this could be immediately after or later in the day. After a hard speed session or long run I prefer to do some gentle yoga poses at home (see below). There are some days where I don’t have a full hour or access to a yoga class so I will do 15-30 minutes on my own with poses depending on what my body is needing (see below). Developing an at home practice is a great option because it can be done at any time.

As someone who loves running, I used to struggle with making time for cross training workouts. I have now realized how important it is to build a strong body for running with other forms of exercise. What I love about yoga is that it’s so effective even if it’s only done a couple times a week and it doesn’t require a huge time commitment. With yoga you get your strength training, core work, stretching, and recovery all in one.

If you are interested in incorporating yoga into your running routine, the Mind Body App on your phone is a great resource. The app will show you locations, class schedules, and pricing for nearby studios. Here you can find the right studio that best suits your needs.

Below are some yoga poses and sequences I like to use. You can do them as I have listed or take a little from each section. Find what works best for you ????  

My Favorite Poses for Running

My favorite yoga poses that have been the most beneficial with my running are hip openers. These poses help hip flexors, glutes, and low back. I try to hold each of these poses for about a minute and take deep, slow breaths with equal inhales and exhales. I find it helpful to count to 5 for each inhale and exhale. These poses might feel a little uncomfortable, however, you should not feel any pinching, pulling, or pain.

  1. Yogi Squat
  2. Lizard
  3. Lizard with Quad Stretch
  4. Pigeon
  5. Cow Face
  6. Child’s Pose, here I like to walk my fingertips to the left and right to find a deeper stretch.

1.2.34.5.6.

Vinyasa Flow

This can be used as a basic yoga practice to help you with strength, flexibility, and cardio. In this flow you will notice that your breath leads your movement. Focus on your inhales and exhales to get the most out of your practice.

  1. (inhale) Start in Down Dog.
  2. (exhale) step or hop between your hands to forward fold.
  3. (inhale) half lift to a flat back, either hands on floor or shins, neck is long.
  4. (exhale) forward fold.
  5. (inhale) sweep your arms up overhead as you stand.
  6. (exhale) bring your hands together, bend your knees, and fold forward.
  7. (inhale) lift to a flat back.
  8. (exhale) forward fold
  9. (inhale) plant your hands step or hop back to a plank, or modified plank on knees.
  10. (exhale) lower to Chaturanga, this can be done on your knees. Engage your core, keep your elbows in at your ribcage as you lower.
  11. (inhale) Upward Facing Dog.
  12. (exhale)Down Dog.

This can be a warmup for other sequences or done as its own workout. You can add variations to this flow to make it more challenging such as moving faster, hopping to the front and back, holding plank longer, and or adding chaturanga pushups. You can repeat this flow a few times or add it in with other stretches and poses depending on your needs.

1.2.3.4.5.6.7.

8.9.10.11.12.

Gentle Yoga

This can be done after speedwork and long runs. I like to hold each of these poses for 5-10 deep, long breaths.

  1. Start in Down Dog, bend one knee at a time to stretch your calves.
  2. Step your right leg forward between your hands and lower your back knee down for a low lunge. Keep your front knee stacked over your ankle.
  3. From low lunge you can keep your hands on the ground or bring them up to deepen the stretch.
  4. Straighten your right leg and press your hips back for half splits. Stay here or fold over your right leg to deepen the stretch.
  5. Come back to your low lunge.
  6. From low lunge, bend your left knee and reach back with your right hand to grab your foot for a quad stretch. If you cannot reach your foot use a towel to wrap around the foot and grab the towel.
  7. Release your left foot and come back to a low lunge.
  8. Walk your right foot to the left for pigeon pose.
  9. Come back to Down Dog and repeat on your left side. If you are looking for a little extra you can add in Vinyasa Flow between poses (see above).
  10. Once you have completed both sides, come back to your Down Dog. Walk your hands back towards your feet for a forward fold. Bend your knees as much as you need to find a nice stretch along your hamstrings. Here you can reach for opposite elbows and sway side to side, shake your head yes and no, and try to relax into this posture.
  11. From your forward fold, turn your toes out and sit down to yogi squat. Separate your feet as much as you need to get your feet flat on the floor. Bring your hands to your heart, sink your hips, use your elbows to press your thighs out and try to get your spine straight. This pose can be very uncomfortable depending on how tight your hips and low back are, take some big deep breaths in and out your nose. I find it helpful to inhale and imagine all the new space I am creating in my body, and exhale to release all the tension and tightness I am feeling.

1.2.3.4.5.6.7.8.9.10.11.

Yoga for strength and core

This can be done in addition to the other sequences and or after any type of run. I like to add in core specific work at least twice a week.  

  1. Start in Down Dog or Child’s Pose if you will be staying on your knees.
  2. Shift forward to Plank and hold 5-10 breaths.
  3. 1-5 Chaturanga pushups, this can be done on your knees.
  4. Press back to Down Dog or Child’s Pose.
  5. Shift forward to Plank and hold 5-10 breaths.
  6. If you are in a full plank squeeze right knee to the center, right elbow, and left elbow 5 times. Repeat on left side.
  7. 1-5 Chaturanga pushups.
  8. Come back to plank and hold 5-10 breaths.
  9. Side plank, hold or lift your top leg 5 times. Switch to other side.
  10. 1-5 Chaturanga pushups.
  11. Come back to plank and hold 5-10 breaths.
  12. Come back to Down Dog.
  13. Step your right foot between your hands, lift to a Crescent Lunge. Right knee is bent, knee is stacked right over your ankle, and left leg is strong and straight. Straighten right leg and reach arms up. Bend back in to lunge and bend arms, 3-5 times. Repeat on left side.
  14. Down Dog or Child’s Pose to finish off.

1.2.3.4.5.6.7.

8.8.9.10.11.12.13.16.

Take breaks as you need, coming back to Down Dog or Child’s Pose. If you are wanting a little more of a challenge, hold the poses for longer and or add in more repetitions.

Yoga for Balance and Stability

I like to do this sequence after easy runs or on recovery days in place of a run.

  1. Start in Down Dog
  2. Warrior A, step right foot between hands, bend right knee, left leg is straight and left foot turned slightly out. Reach arms up overhead, hold for 5 breaths.
  3. Release hands behind your back and interlace fingers for a shoulder opener.
  4. Humble Warrior, fold forward with fingers interlaced, right shoulder should come inside the right knee and gently press the knee out to keep hips square, relax you head. Hold for 5 breaths.
  5. Lift back up, place hands down and come back to Down Dog, repeat on the left side.
  6. Down Dog.
  7. Crescent Lunge, step your right foot between your hands, keep your front knee bent and back leg straight.
  8. Sweep your chest to thigh, hold here, engage your core, lengthen through your neck and spine.
  9. Shift forward to Airplane. Balance on your right foot, lift your left leg, flex your left foot, reach your arms back, and keep your hips square.
  10. Lift your arms up over head as you bring your left knee to your chest, take one breath here.
  11. Take your left leg back for airplane. Repeat 3-6 times.
  12. Come back to Crescent Lunge. Plant your hands, come back to Down Dog, and repeat on the left side.
  13. Down Dog
  14. Step or hop your feet between your hands for a forward fold.
  15. Sweep your hands up over head and come to a standing position.
  16. Hug your right knee to your chest, you can hold your knee or reach for your big toe.
  17. Extend your leg or knee to the right, reach your left arm out and take your gaze to the left. Come back to the center and repeat on your left side.
  18. From standing, bring your right foot in for Tree Pose. Your right foot can be placed on your left ankle, calf, or inner thigh (the most important thing in this pose is to not place your foot on your knee). From here bring your hands together at your chest. For an extra challenge you can close your eyes; notice all those little muscles working and strengthening in your foot and ankle.

1.2.3.4.5.6.7.8.9.10.11.12.13.14.15.16.17.18.

Happy Running & Namaste!

Annelie

Team RunRun coach Annelie Stockton is a yoga instructor, a 3:10 marathoner, and a mother of two young kids, James and Mia